How to Fix Steam Game Randomly Uninstalled Itself on Windows 10
There can be many reasons behind Steam games randomly uninstalled issue. Here are some of them.
How to Fix Steam Game Randomly Uninstalled Itself on Windows 10 Method 1: Create New Library Folder Method 2: Run Games Directly Method 3: Modify Appmanifest File
Steam not detecting Library folder Issues in reading ClientRegistry file Corrupt Appmanifest file
After learning the possible reasons why your Steam game uninstalled itself, let us go over some methods to fix this issue where your installed games are appearing as uninstalled.
Method 1: Create New Library Folder
If you download your Steam games in a separate folder then sometimes, Steam may find it hard to locate and it will not detect your game. It can cause Steam game randomly uninstalled issue. To resolve this, you can make a new library folder to store your games. Follow these steps to do the same.
Press the Windows key, type Steam and click on Open.
In the top left corner, click on Steam option and select Settings.
Then, click on Downloads option present in the left pane.
Now under Content Libraries section, click on STEAM LIBRARY FOLDERS button. It will open Storage Manager window displaying your current storage drives.
Next, click on + symbol next your storage drives. You will see a prompt titled Add a new Steam Library Folder.
Then, click on the dropdown menu and select Let me choose another location option.
Click on the Add option.
After this Create or select new Steam library folder: window will pop up. Choose one of these:
a pre-existing folder or create a new one by clicking on New Folder… button.
- After selecting the folder of your choice, click on Select button. Also Read: Fix Steam Image Failed to Upload
Method 2: Run Games Directly
If you are still facing Steam game randomly uninstalled issue then you can try and run games directly from common folder by selecting their executable files. Some users have reported that this method resolved the issue. To do that, follow these steps.
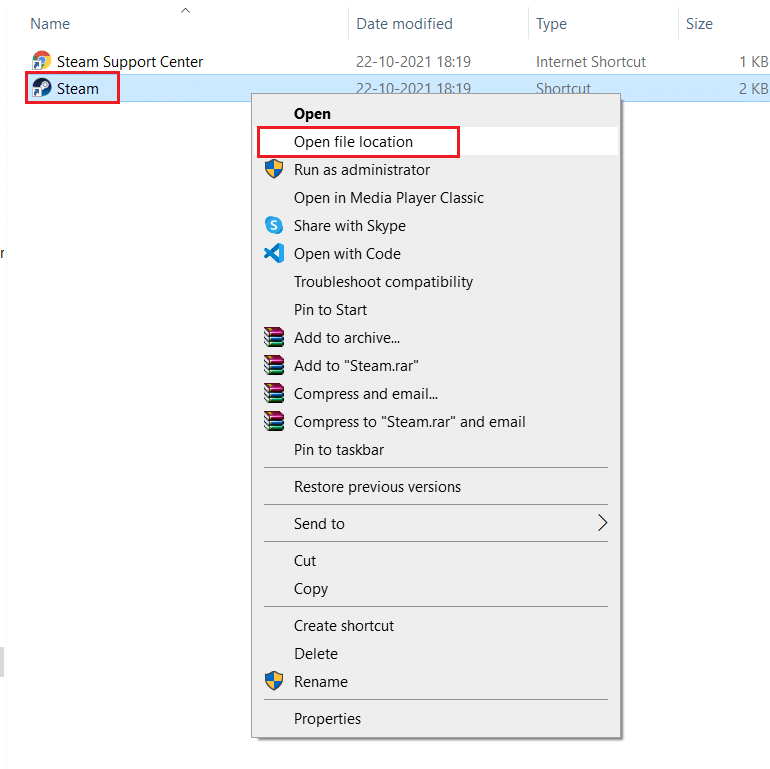
Right click on Steam shortcut icon and select Open file location. Note: In case you don’t have Steam shortcut then you can reach Steam folder by going to its default location viz C:\Program Files (x86)\Steam. Or read our guide Where are Steam Games installed here.
Inside Steam folder, find and double click on steamapps folder.
Inside Steamapps folder, locate common folder and double click on it.
Find that game folder (e.g. Chess) which is causing the problem and double click on it.
Locate .exe file of that game and double click on it to open it. Confirm any Steam prompt. Also Read: Fix Steam Error Code e502 l3 in Windows 10
Method 3: Modify Appmanifest File
Appmanifest File is present in steamapps folder and stores information about location of Steam game. But it can be damaged or corrupted by your Antivirus program which may detect it as a malicious file. It might cause Steam game randomly uninstalled issue. You can resolve this problem by modifying appmanifest file using the following steps.
Navigate to the Steamapps folder as shown in Method 2.
Here, locate appmanifest_X.acf file. Here X means game ID which will vary from game to game. Note: If you are confused which ID represents which game then you can search that ID in the steamdb info page. You will get the necessary information.
Right click on appmanifest_X.acf file and select Open with > Notepad option.
In Notepad, press Ctrl + F keys simultaneously to open Find window.
Type installdir in text box next to Find what and click on Find Next button.
Once installdir is located, replace the text there with the name of the folder of the game. Note: You can check the name of the folder of the game in this location C:\Program Files (x86)\Steam\steamapps\common. All games are located here.
Launch Steam app from Windows Search bar. Sometimes Antivirus program can delete appmanifest file, if you are unable to find appmanifest file in steamapps folder then follow these steps.
Find game ID of the game which is causing the error by going to the steamdb info page. Note it down.
Go to the given location path in the File Explorer.
Inside downloading folder, locate folder with ID number that you noted in step 8. Double click on it to open it and then minimize it.
Launch Steam and select LIBRARY tab.
In right pane, below Games section, locate the problematic game and right-click on it and select Install.
As soon as you click on Install, check folder you minimize in step 11. Delete all files present in it by pressing Ctrl + A keys together to select all files and then right click and select Delete option. After this, Steam will stop downloading the game and check for missing file, which it will download later. This should resolve the issue. Recommended:
How to Perform 5.1 Surround Sound Test on Windows 10 Fix Microsoft Solitaire Collection Not Working on Windows 10 Fix Steam Client Bootstrapper High CPU Usage on Windows 10 Fix Steam Stopping Downloads on Windows 10
We hope that this guide was helpful and you were able to fix Steam game randomly uninstalled issue. Let us know which method worked for you the best. If you have any queries or suggestions then feel free to drop them in the comments section.


![]()


